Over the weekend I got started on my Flames of War box of goodness. I had ordered some decals to go with my Irish Guards, but didn't realize they're only about a third of what I needed, so I need to hit the intarweb and find some more regimental symbols. Though I love my tank sculpts, I still want to stick a bunch more stowage and gear on them too.

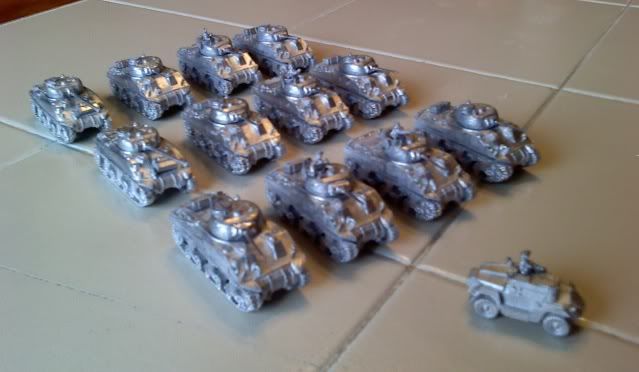
Here they are, a dozen Sherman V's ready to roll. As you can see, up front leading the column is a tiny little JOE Vandeleur in his Humber scout car. I didn't get the official FoW Vandeleur, but made my own. A single tank commander and a pack of x4 Humbers was still cheaper. Putting these tanks together went fairly well but I still suffered some hiccups. First of all, about five tanks in I realized I had glued all of the treads on backwards! They're not labeled 'left' or 'right' on the inside of the piece so I had no idea. After looking at it though, something didn't seem right, after I switched them, everything was back on track, ahem.
Above I have 995 points worth of armour:
x1 Guards Armoured Command Squad (four Shermans)
x2 Guards Armoured Platoons (three Sherman, one Firefly each)
x1 JOE Vandeleur

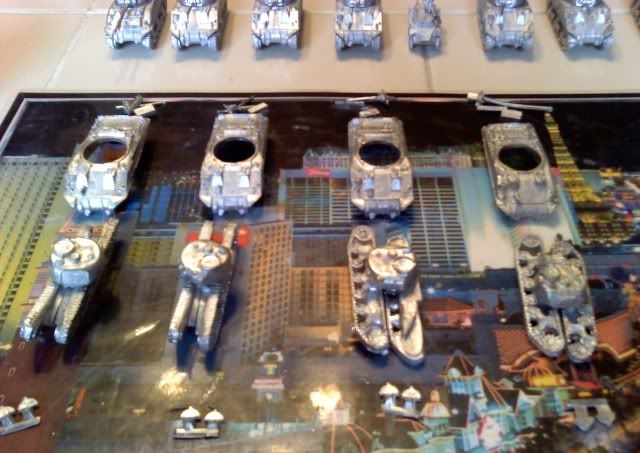
The other annoyance were those freaking tank hatches for the cupola! As you can see in the pic here, in front of each pile o' parts were the hatches. You had to trim them out, cut them down, then get them glued into place. Of course this doesn't mention the cupolas that have commanders sticking out, ugh! In the end I managed to 'batten down the hatches' and still retain some of my sanity. All in all, these twelve tanks went together in an evening. I mostly used regular super glue, with stronger stuff (Gorilla Glue brand super glue) for the tracks themselves. Obviously I didn't glue down the turrets.
Not shown here is the work I've done since taking these pics. I've got the x12 tank chassis (what's plural for 'chassis') painted and done. I picked out tool handles and supply boxes in brown, exposed metal in gunmetal grey, and did a heavy overbrush of Russian Uniform green, the official FoW armour color over the rest of the model. I was all proud of myself until Andy pointed out the interior tread wheels are actually green in color, not the steel I had painted them, double ugh. I'll go back and fix them of course. Next up are the turrets.
Awesome bit of work and a good chunk of metal there. Don't worry too much about the exposed metal, you can dry brush green over it and give it that worn appearance. Besides, you'll likely end up muddying them up a bit anyhow.
ReplyDeleteEli is spot on... I am never too careful with the running gear of my tanks, since I usually apply a liberal coat of dirt/dust to the underside. I've never seen a clean operational tank unless it was just rolling off of the tank wash platform.
ReplyDeleteGreat to see these coming along. At this rate you'll definitely be ready for a scenario when I get back from my conference. When some speaker starts to ramble on, perhaps Mr. Crackberry and I will have to sit and do a little scenario research...
@Eli and Brian: Yeah, I'll give it a quick once-over, but fix it I shall. Brian, I can guarantee these thousand points will be complete by the 28th. They might not have all the decals I'm still searching for, but they'll be painted and ready. Glad you guys mentioned the weathering/dust, I forgot to add that, but it should be easy enough. Actually I'm very surprised at how quickly these have painted up.
ReplyDelete@25mmW: Well I did go with the most economical models I could find (Command Decision), some of the other models out there (with much higher pricetags) offer a lot more options, including tank cupolas with hatches modeled open. Yeah, I'm happy with my compact, little 1k point force. Good luck getting your friends in on it!
I feel like I have had a wargaming coming of age moment, I was able to correct somebody else's paint job! *sniff* Maybe I am not quite a true wargamer yet as I wasn't a complete sh!t about it... ;-)
ReplyDelete